

How To Set Up A Loan In Quickbooks
Learn how to fix accounts for your loans, and manually track them in QuickBooks Desktop for Windows and Mac.
Cash and non-cash asset loans such as vehicles and office equipment are liabilities for your company. QuickBooks lets yous rails the loan amount and record your payments so you can stay on top of it. Nosotros'll show you how.
Note: If yous want to keep rail of your loans and exist reminded about upcoming payments, you can rails and manage your loans with the QuickBooks Loan Director .
QuickBooks Desktop for Windows
Start tracking your loans in QuickBooks Desktop for Windows.
Step 1: Set up a liability business relationship
When y'all record a loan in QuickBooks, yous need to select a liability account for it. Here'southward how to gear up a liability account for your loan.
- Become to the Lists carte, then selectChart of Accounts.
- Right-click anywhere, then select New.
- Select Other Account Types, and then select the right account blazon for your loan:
- Other Current Liability: Use this for brusk-term loans payable over one year.
- Long Term Liability: Utilise this for long-term loans payable over a longer flow.
- Select Proceed.
- Enter the proper name and number for the account.
- Select Salve & Close.
Stride ii: Set up up the vendor (Banking company/lending company)
Create a new vendor for the banking concern or company yous demand to pay for the loan.
- Get to the Vendors menu, then select Vendor Center.
- Select New Vendor.
- Enter the name of the bank or the company you need to pay for the loan.
- (Optional) Enter other vendor details such every bit phone number and e-mail address.
- Select OK.
Step 3: Set up an expense account
Create an expense account so you tin can rail interest payments or fees and charges.
- Go to the Lists bill of fare, then select Nautical chart of Accounts.
- Correct-click anywhere, then select New.
- Select Expense, then Go on.
- Enter the account name for the involvement payments or fees and charges.
- Select Salve & Close.
Step 4: Record the loan amount
Now that you take a liability account for the loan, hither'due south how to record the loan corporeality.
Cash loans
- Go to the Banking menu, so select Make Deposits.
- If the Payments to Deposit window opens, select Cancel.
- In the Make Deposits window:
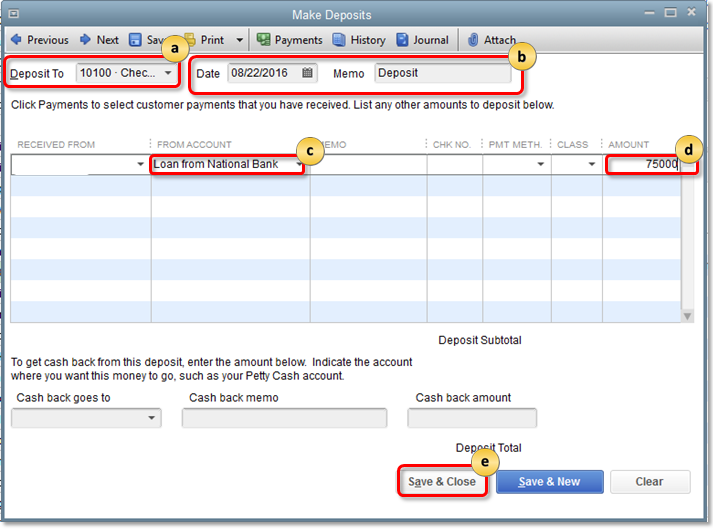
- In the Deposit To field, select the account to deposit the loan into.
- Check the Date and enter an optional Memo.
- In the From Account column, select the Liability account you created in Step i.
- In the Amount cavalcade, enter the loan corporeality.
- Select Save & Close.
Non-cash loans
- Create an asset account.
- Become to the Lists menu, then select Nautical chart of Accounts.
- Correct-click anywhere, then select New.
- Select the account type for your non-cash loan:
- Fixed Asset: Use this for items that have useful value for more a year (vehicles, buildings, then on)
- Other Current Asset: Utilise this for items with value that tin can be converted to cash (like prepaid expenses)
- Other Nugget: Use this for items that are neither Stock-still Assets nor Other Current Assets.
- SelectContinue.
- Enter the name and number for the account.
- When y'all're done, select Salvage & Shut.
- Enter a periodical entry.
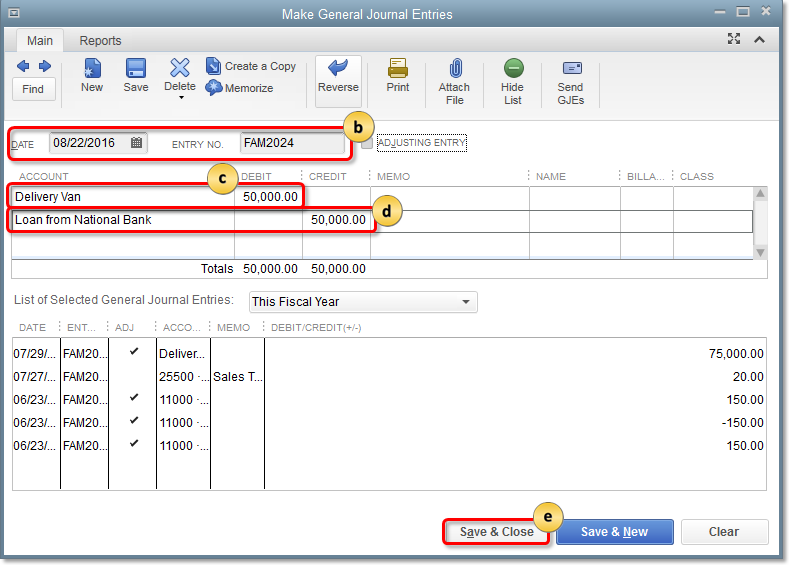
- Go to the Visitor bill of fare, then select Make General Journal Entries.
- Enter the Date and journalEntry No.
- Select the outset line and debit the loan asset account.
- Select the second line and credit the liability account.
- Select Save & Shut.
Footstep 4: Tape loan payments
| Reminders:
|
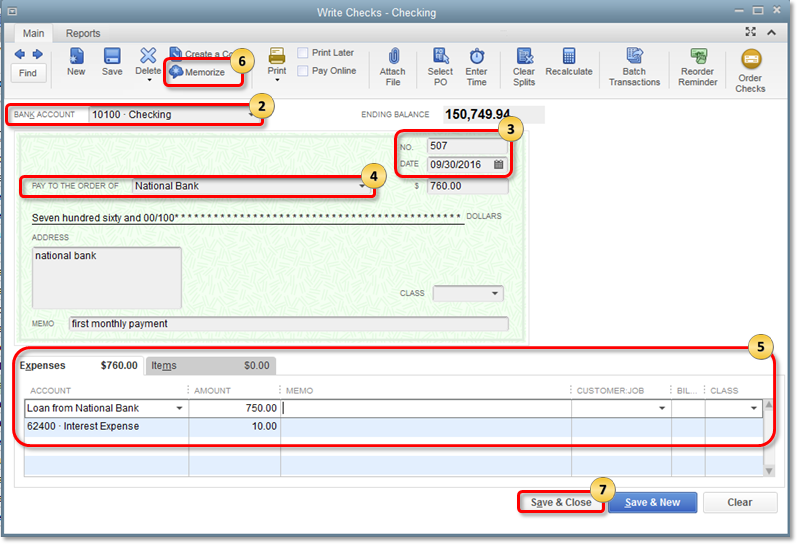
- Become to the Banking menu, and so select Write Checks.
- Select the Bank Business relationship you desire to use to pay the loan.
- Verify the Check NO. and Date.
- In the Pay to the Social club of field, select the name of the bank.
- In the Expenses tab:
- On the first line, select the liability business relationship you created in Step one. Then enter the payment for the master amount.
- On the second line, select the interest expense business relationship. So enter the payment for the loan interest.
- (Optional) Memorize the bank check if you want QuickBooks to automatically enter the payment at regular intervals.
- Select Memorize.
- Fill up out the fields as needed.
- Select OK.
- When you're done, select Save & Close.
QuickBooks Desktop for Mac
Learn how to manually track loans in QuickBooks Desktop for Mac.
Step ane: Prepare a liability account
When you record a loan in QuickBooks, you demand to select a liability account for it. Here'due south how to set up a liability account for your loan.
- Go to the Lists menu, so select Chart of Accounts.
- Select the + icon to add a new account.
- From the Blazon field, select the account for your loan:
- Other Current Liability: for brusque-term loans payable over one year.
- Long Term Liability: for long-term loans payable over a longer period.
- Enter the name and number for the account.
- Go out the opening rest at zero.
- Select OK.
Step ii: Set up the vendor (Depository financial institution/lending company)
Create a new vendor for the bank or company yous demand to pay for the loan.
- Go to the Vendors bill of fare, and then select Vendor Center.
- Select the +icon, then select New Vendor.
- Enter the proper noun of the bank or the company you lot need to pay for the loan.
- (Optional) Enter other vendor details such every bit phone number and email address.
- Select OK.
Step 3: Record the loan amount
At present that you accept a liability account for the loan, here's how to record the loan corporeality.
Cash loans

- Become to the Banking menu, then select Make Deposits.
- If the Payments to Deposit window opens, select Cancel.
- In the Make Deposits window:
- In the Eolith To field, select the account to deposit the loan into.
- In the From Business relationship column, select the liability account yous created in Pace ane.
- In the Amount column, enter the loan amount.
- Select Save.
Not-cash loans
- Create an asset account.
- Become to the Lists menu, then select Chart of Accounts.
- Select the + icon to add a new account.
- Select the asset account for your loan:
- Stock-still Nugget: Use this for items that have useful value for more than a year (vehicles, buildings, so on)
- Other Current Asset: Utilise this for items with value that can exist converted to cash (similar prepaid expenses)
- Other Asset: Use this for items that are neither Fixed Assets nor Other Current Avails.
- Select OK.
- Enter a journal entry.
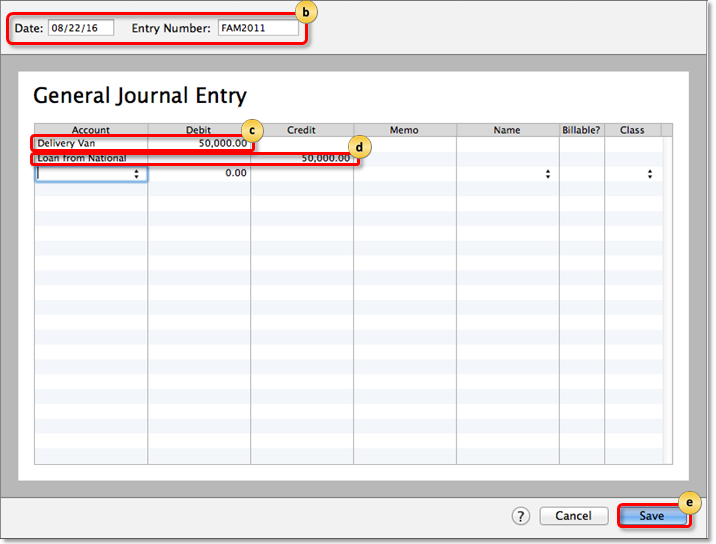
- Go to the Company carte, and so select Make General Journal Entries.
- Enter the Engagement and journal Entry Number.
- Select the first line and debit the loan asset account.
- Select the 2nd line and credit the liability account.
- Select Save.
Footstep 3: Record the loan amount
| Reminders:
|
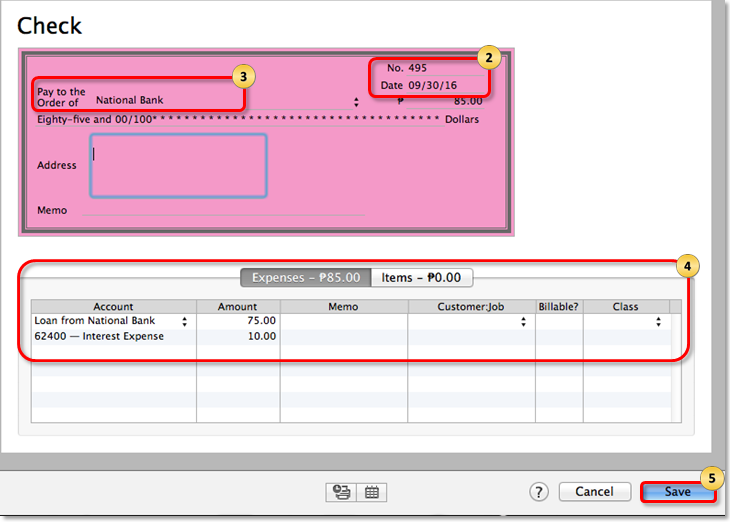
- Go to the Banking carte du jour, then select Write Checks.
- Select the Bank Account you desire to use to pay the loan.
- Verify Check NO. and Date.
- In the Pay to the Guild of field, select the proper noun of the bank.
- In the Expenses tab:
- On the first line, select the liability business relationship y'all created in Stride 1. And then enter the payment for the master amount.
- On the second line, select the interest expense account. Then enter the payment for the loan interest.
- (Optional) Memorize the check if y'all want QuickBooks to automatically enter the payment at regular intervals.
- Select Edit.
- Select Memorize Bank check.
- Select OK.
- Select Save & Close.
Source: https://quickbooks.intuit.com/learn-support/en-us/help-article/chart-accounts/manually-track-loans-quickbooks-desktop/L6UGYFBQX_US_en_US
0 Response to "How To Set Up A Loan In Quickbooks"
Post a Comment